We recently renovated our condo (yay!) and one of my favorite additions is the new closet that we built. We went through a long process of considering different options for this closet from higher end custom-built done-for-you options (California Closets) to ready made more budget friendly options and ultimately decided on building our own using the IKEA Pax wardrobe system. This is a very popular product and you can find a lot of information on how to build it and organize it, but less information on how to plan out the system before you buy and build it out. We were ready to tear out our hair when shopping for the closet, because to be honest, IKEA does a pretty crappy job teaching us how to shop and build this closet.
This is where I come in.
You may think that the first step to planning your closet is to make a trip to your nearest IKEA, right?
Wrong! You’ll just get overwhelmed with the options and choices. That’s what happened to us. (Exception: If you want to go to be inspired or look at it in person to see if it’s the right fit, then go ahead.)
Otherwise, save the trip and read on: in this post, I’m going to show you exactly how we planned our IKEA PAX closet from scratch and the tips and tricks that will help you plan your dream IKEA Pax closet!
Step 1: Take Inventory of Your Stuff
What you need:
- Pencil & Paper
- Or, download this handy “How To Plan Your Perfect Closet” worksheet
If you’ve ever wanted to Mari Kondo the heck out of your closet, here is your chance! If you’re not familiar with the Mari Kondo method yet, check out the Netflix show, or read the book!
Basically, you go through all of your clothes, accessories, bags and shoes and really think about if you want to keep it, or thank it and let it go. Donate or give away everything in your “let it go” pile, and organize the rest into categories.
Now write down how many pieces of each category you have. This way, you have a complete inventory of items you need to store in your new closet and can build it to your exact needs.
Pro Tip: Need help? My “How To Plan Your Perfect Closet” worksheet can help! Get it delivered to your inbox.
Step 2: Measure Your Space
What you need:
- Tape measure
- Pencil & Paper
Next, measure the space that you want your closet to be in. It could be a walk in closet space or it could be a wall on one side of your bedroom. Measure out that area: write down the length, width, and height of the space and jot it down.
Once you have the dimensions down, draw a sketch of the space – it doesn’t have to be perfect, just close enough to help you visualize the dimensions and shape of the area that you want to build the closet in. This will help you determine how much hanging space you need vs. drawer space vs. any small accessory storage options you may need.
Here is an example of what my sketch looked like. I used an iPad and the “grid” paper setting in GoodNotes 5. As you can see, my space was 112 in wide, 165 in long, and 96 in tall.
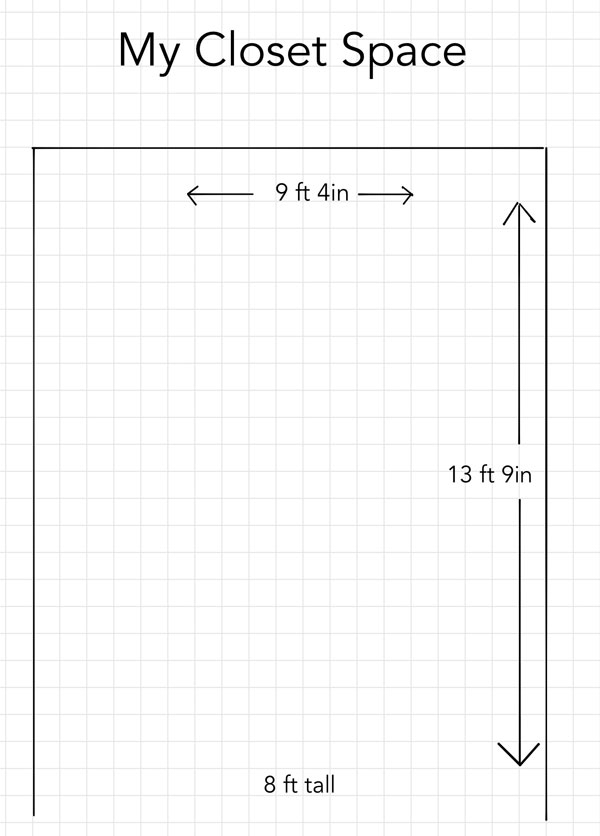
Helpful tip: If you live in the US, measure it out in both feet/inches and total inches, if you live anywhere else in the world, use centimeters. Trust me on this one.
Step 3: Understand the IKEA PAX system
This is the key between a stress-free planning experience vs. the hair-tearing experience we had. Just by looking at IKEA’s website or visiting the store you will get overwhelmed with the endless options and weird sizing.
Here’s a simplified, easy way to understand the system: the IKEA PAX system comes in 3 different widths, 2 different heights, and 2 different depths. They also offer corner units but I did not use any.
- Height is easy to choose, you’re at the mercy of the height of your ceiling. If you have 8 foot (96 in) tall ceilings and you want your closet to extend all the way to the top, you’re going to choose the 92 7/8″ option here. If you have lower ceilings or do not want to extend closet to the top you can choose the shorter 79 1/4″ option.
- Depth depends on how deep you want your closet to be and the space you have to work with. For me, my space allows me to go with the deeper 22 7/8″ option, which allows you more storage space for your drawers and clothes. If you are pressed for space or installing this in a narrower room you may want to look into the 13 3/4″ option. My recommendation is to go with 23 inch if you can help it to maximize your space and so your clothes don’t stick out.
- Width of the unit is where you have some room to play with. The exact dimensions to choose from are: 39 3/8″, 29 1/2″, and 19 5/8″. Do yourself a favor and just round up: 40″, 30″ and 20″. There, doesn’t that make it easier? How you put together these units depends on the space you have and the amount of clothes you want to store.
| Width | 39 3/8″ | 29 1/2″ | 19 5/8″ |
| Height | 92 7/8″ | 79 1/4″ | |
| Depth | 22 7/8″ | 13 3/4″ |
Step 4: Plan out your closet on paper
Now that you have a basic understanding of the options you have, the PAX system doesn’t seem that daunting anymore, right? The key for me is when I realized that once you narrow down the height and depth, all you need to play around with is the width.
Here’s the updated sketch of the space we drew, with the PAX frame width dimensions added in:
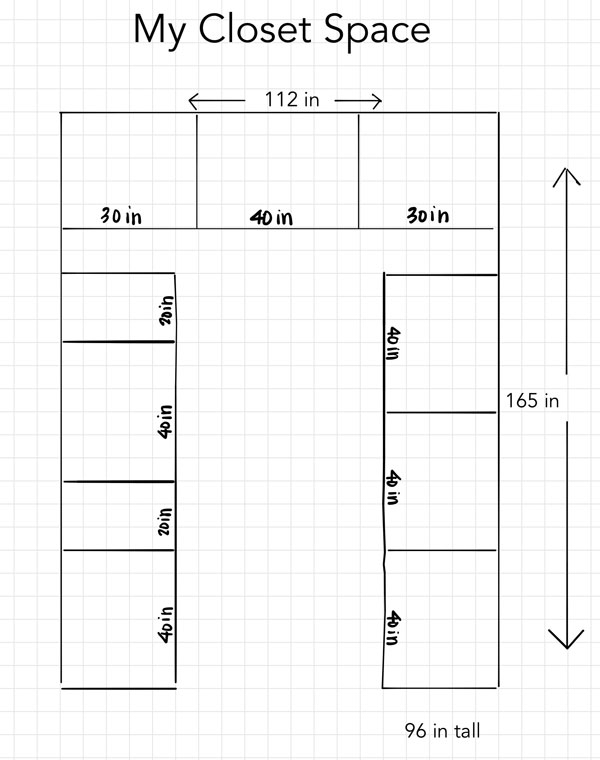
You can see that we used all three frame widths, in other words, a combination of widths to suit our needs. It’s okay if you change your mind later as you’re planning, as long as they add up to fit the space you have.
Step 5: How to Use the IKEA PAX Planning Tool
Arguably one of the single most useful tool when designing this closet is the (free) IKEA Pax Designing Tool. The tool is super helpful, and knowing some tips and tricks can make the planning process so much easier.
What you need:
- The finished sketch of your closet space (from step 3)
- Your completed closet planning worksheet of inventory (from Step 1)
- A laptop or desktop computer with an internet browser that can run Adobe flash (if you don’t have a computer and only have an ipad or phone, you can always visit an IKEA in person. They have computers there you can use)
Once you land on the planner page, click “Create PAX from scratch” – choose the shape of your room – in my case I chose the square and put in my dimensions of the room. This is where the feet/inches measurement you took earlier comes in handy! I put mine in – 9 ft 4 in wide and 13 ft and 9 in long.
Once you have your room set up, the fun begins! Click on “frames” and use the filter tool to pre-select the following:
- The height you want
- The depth you want
- The color of your choice
Now, you should only have a few options to choose from based on width. I suggest you play around with the different width sizes because different width frames will have different drawer/organization options to choose from. Use your inventory list while planning to decide how many rails, drawers, shelves, trays and baskets you will need.
Pro Tips:
- The planner tool uses “drag” and drop functionality. It takes some playing around to get used to, but you’ll get the hang of it.
- To add accessories/drawers to a frame, click on the frame and the “interior organizers” button.
- Filter, filter, filter! They secret to not getting overwhelmed is to use the filter tool whenever possible to display only the options you want.
- Save and print your plan. The tool will give you a unique code to come back to so your hard work isn’t lost. Starting from scratch is a pain. Trust me, I would know.
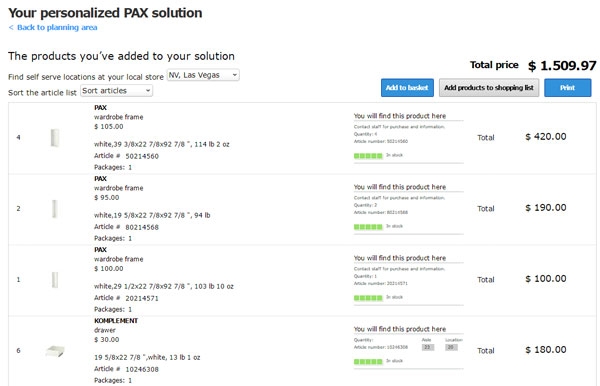
- You can add all of the items you used in the planner to your shopping cart. If you select your store, you can also see what items are in stock and where to find them.
Step 6: Make a trip to IKEA (finally!)
After you’ve played around with the planning tool for a bit and have a pretty good idea of the closet you want to build, you should make a trip to IKEA and bring your sketch, clothing inventory, saved code of your plan, and your shopping cart list.
While you are there, here is what you should do:
- Ask associates for help if you had trouble figuring out how to use their planning tool.
- Check all of the accessories and drawers in person: it can be difficult to see the details of the accessories on the planning tool, so it’s a good idea to check out all of these in person ahead of time. Do you like the look and feel of the glass drawers? What kind of pull out tray and dividers look like they meet your needs?
- Make adjustments to your shopping cart list as necessary
- Use your shopping cart list and go to the pickup area and see how big/heavy the boxes are for your items to decide if you want to buy in person and haul home yourself or use the delivery service for a fee.
Step 7: Purchase your IKEA PAX system
Hooray! Now that you’ve made it this far, it’s time to buy your closet! You can either order online and have IKEA deliver it to you, or (my recommended option) pick it up yourself.
I’ve had pretty awful experiences with IKEA furniture delivery in the past, so I pick it up myself whenever possible. For a large project like this, we hired our contractors for 3 hours to have them pick it up with us. because the frames are quite large so you will need a truck to fit everything in.
What’s Next?
Are you feeling inspired? What are you waiting for? Grab this worksheet and start planning out your dream closet today! This worksheet doesn’t work well just for IKEA PAX, it’ll work with whatever closet system you choose. The process is what California Closets and other custom closet companies use to determine what to build – they first take inventory of all of your stuff.
Once you have this step figured out, you’re well ahead of the game!
If you have any questions about building out a closet, drop me a note – I’d be happy to help!